Wildfly 이해
- Redhat이 2006년 Jboss inc 인수
- Java EE(Enterprise Edition)을 모두 지원
- 상용 솔루션으로는 JBoessEAP가 있고, Wildfly (구 JBoss AS)는 커뮤니티 성 솔루션
- java EE 의 전체 Stack은 다음 Diagram으로 대체
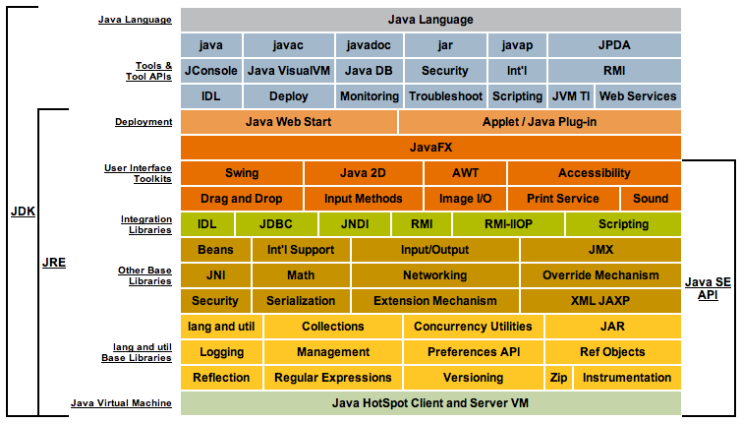
사진 설명을 입력하세요.
1.Wildfly와 Tomcat의 stack 비교
항 목 | Wildfly | Tomcat |
제공기능 | Application Server (Tomcat 내장) | Servlet Container (web server) |
메모리 사용량 | Tomcat대비 많음(2~300M) | 상대적으로 적음 (6~70M) |
DB Connection | 내장 | 없음(별도 라이브러리 사용필요) |
장/단점 | JAVA EE를 포함하고 있기 때문에 다양한 기능 제공 메모리 점유율이 높음 | J2EE전체 기능이 필요없는 경우 사용 상대적으로 가볍게 작동함 |
Link |
구동모드 설정
구동모드 | 상세설명 |
standalone | 단일 인스턴스로 실행 인스턴스단위로 프로파일 및 설정파일이 개별적으로 작동 |
domain | 도메인 컨트롤러 포함 다수 인스턴스가 그룹으로 구성, 인스턴스별 그룹지정이 가능하고, 그릅단위로 설정 |
Wildfly 프로파일 설명
프로파일명 | 설정파일 | 제공기능 |
default | standalone | infinispan, ee, ejb3 |
ha | standalone-ha | jgroup, modcluster, infinispan, ee, ejb3 |
full | standalone-full | jacorb, messagging, webservice, infinispan, ee, ejb3 |
full-ha | standalone-full-ha | jacorb, messagging, webservice, jgroup, modcluster, infinispan, ee, ejb3 |
디렉토리 구조
디렉토리 | 설명 |
appclient | 클라이언트용 홈디렉토리 |
bin | 스크립트 파일 |
docs | xml / 설정파일 |
docs/examples/configs | 예시 구성파일 |
domain | domain 홈디렉토리 |
modules | 추가 모듈 디렉토리 |
standalone | standalone 모드 홈 디렉토리 |
standalone/configuration | standalone 모드 설정파일 |
standalone/data | standalone 모드 생성파일 |
standalone/deployments | app배포 |
standalone/lib/ | JAVA EE / SE 라이브러리 |
standalone/log | 로그파일 저장소 |
standalone/tmp | 임시파일 저장소 |
welcome-content | 첫 페이지 경로 |
Wildfly 설치
java (1.8이상 설치 필요)
$ yum install java-1.8.0 -y
...
$ which java
/usr/bin/java

$ /usr/bin/java -version
openjdk version "1.8.0_292"
OpenJDK Runtime Environment (build 1.8.0_292-b10)
OpenJDK 64-Bit Server VM (build 25.292-b10, mixed mode)
바이너리 다운로드 후 압축해제
$> wget https://download.jboss.org/wildfly/24.0.0.Final/wildfly-24.0.0.Final.tar.gz
$> tar -zxvf wildfly-24.0.0.Final.tar.gz -C /usr/local/
$> ln -s /usr/local/wildfly-24.0.0.Final/ /usr/local/wildfly
외부 접속 허용하기
 vi /usr/local/wildfly-24.0.0.Final/standalone/configuration/standalone.xml
...
        <interface name="public">
            <inet-address value="${jboss.bind.address:0.0.0.0}"></inet-address>
        </interface>
...
management user 생성
./add-user.sh

What type of user do you wish to add?
 a) Management User (mgmt-users.properties)
 b) Application User (application-users.properties)
(a): a

Enter the details of the new user to add.
Using realm 'ManagementRealm' as discovered from the existing property files.
Username : {{ 계정명 }}
Password recommendations are listed below. To modify these restrictions edit the add-user.properties configuration file.
 - The password should be different from the username
 - The password should not be one of the following restricted values {root, admin, administrator}
 - The password should contain at least 8 characters, 1 alphabetic character(s), 1 digit(s), 1 non-alphanumeric symbol(s)
Password : {{ 계정 패스워드 }}
Re-enter Password : {{ 계정 패스워드 }}
What groups do you want this user to belong to? (Please enter a comma separated list, or leave blank for none)[  ]:
About to add user 'csadmin' for realm 'ManagementRealm'
Is this correct yes/no? yes
Added user 'csadmin' to file '/usr/local/wildfly-24.0.0.Final/standalone/configuration/mgmt-users.properties'
Added user 'csadmin' to file '/usr/local/wildfly-24.0.0.Final/domain/configuration/mgmt-users.properties'
Added user 'csadmin' with groups  to file '/usr/local/wildfly-24.0.0.Final/standalone/configuration/mgmt-groups.properties'
Added user 'csadmin' with groups  to file '/usr/local/wildfly-24.0.0.Final/domain/configuration/mgmt-groups.properties'
Is this new user going to be used for one AS process to connect to another AS process?
e.g. for a slave host controller connecting to the master or for a Remoting connection for server to server Jakarta Enterprise Beans calls.
yes/no? yes
To represent the user add the following to the server-identities definition <secret value="Y3MxMjMhQCM=" ></secret>
실행하기
./bin/standardalone.sh &접속하기
- 브라우져 로그인 : http://{{ 서버IP }}:8080/
- 관리자 콘솔 로그인 : http:~/~/~{~{ 서버IP }}:9990/console/index.html>>http://서버ip:9990/console/index.html]] (로그인 계정은 4. management user 생성 참고)
참조

